LNER Sleeping Cars
The plan is to look at prototype and models of the following types based on Kirk Kits:
61'6" SLF - 1st Sleeping car - 1927-29 61'6" SLT - 3rd Sleeping car (convertible) - 1931 66'6" SLF - 1st Sleeping car (longer length) - 1932-38
Some will require tweaking, others, cross-kitting.
The 61'6" SLF has already been done, this part looks at the longer length, again based on Kirk Kit parts.
66'6" 1st Sleeping Car
This part has been revised following discovery of confusion in Michael Harris's books of 1973, 1994 (reprinted 2011), in which the first batch of the revised, second Diagram built in 1936 was listed as D.157 instead of D227. Boy, had that caused confusion! It's a reminder of the fact that both officialdom and authors are fallible.
In 1930 the LNER decided to add a shower to its 1st class sleeping cars and a twin (SLF-SLF) was taken and a compartment converted accordingly. In 1932 construction went over to a new length of 66'6" which was essentially the 61'6" design plus a shower. The constructional sequence was:
1932-5 D.157 1156-7, 1165-8, 1211-4 (8)
1936-7 D.227 1591-3, 1673-7 (6)
There were differences between these two Diagrams:
- In D.157 the compartment windows were in close pairs, as per the Kirk 61'6" SLF kit. In D.227 they were spaced evenly. - both were pressure ventilated but in D.227 it was heated. - According to the Diagrams, three long panels were fitted below the waist for D.157, going over in D.227 to a more economical four shorter lengths. This can be seen in Harris (1973, p.114) and (1994/2011, p.92).
The illustrations below show both versions, but not all the sides so I am adding both LNER Diagrams. The model is based on D.157.
In service
These cars were put in the more important Anglo-Scottish sleeper services and when the "Northern Belle" ran, several were transferred into it. Their showers were especially useful and the "Northern Belle" ran off-peak so that these cars could be used. Its formation and conventional sleepers are covered in LNER Passenger Trains & Formations, The Principal Services. I'll add some pictures of the 66'6" 3rd class sleeping cars later.
D.157

This is the whole of the LNER Diagram. As usual, it only shows the layout - that was the purpose of a Diagram - and some details, such as the tumblehome, are exaggerated. The Isinglass series of modellers' drawings has translated the latter aspect as if real, while Hornby almost flattened it! I've added a closer view below. More were built as listed above; not all the numbers had been added on this page (they were usually listed on the facing page).
Click on the image for an enlargement

An enlargement shows the layout of the compartments more clearly. Note how there was a linking door between each pair of compartments that was normally locked. If you go back to the whole dwg you'll notice that two compartments near the middle had double connecting doors and one of the beds was removable. I can only imagine that it was for somebody who was not travelling light, wanted to keep a close eye on certain possessions, and was of course prepared to pay for two berths. Quite interesting that the LNER, a company often viewed as cash-strapped, had gone to such lengths with its finest sleeping cars.

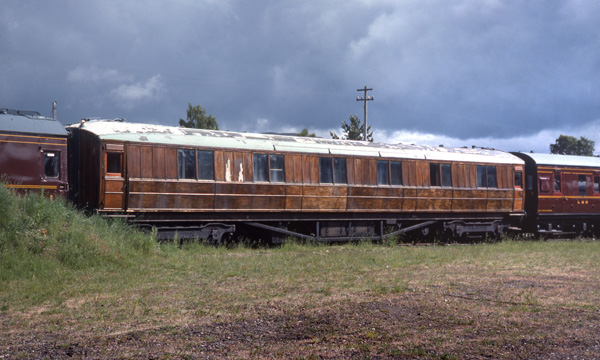
Currently my only portrait of D.157, it's hard to believe now that a 66'6" SLF was saved and partly restored when I photographed it at Boat of Garten in June 1977. Such beauty (and quite a grand sky, too)! The oblique lighting has made the general structure and Gresley design features stand out well. This is No 1211 built Doncaster in 1935.
I believe that it was the last one in service and it had been repanelled in places, no longer per the original build, but unfortunately, its condition eventually decayed most horribly. In 2015 it was moved to Bo'ness with the intention of restoration and inclusion in the Museum of Scottish Railways. I wish them well.
Click on the image for an enlargement
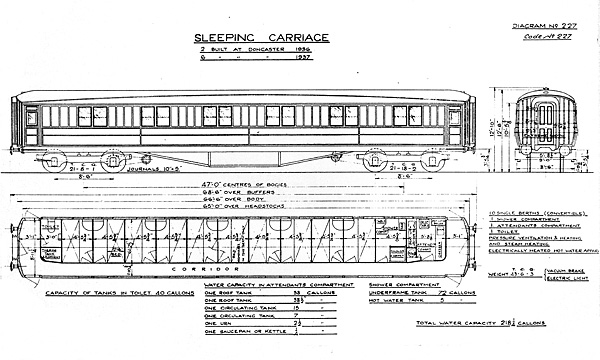
D.227

The second Diagram introduced in 1936 with evenly spaced windows on the compartment side and heated pressure ventilation. Note how much more detail was stated about the water capacity, possibly because it was increased.
Click on the image for an enlargement

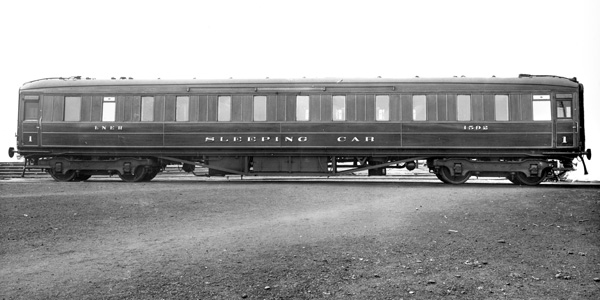
66'6" SLF No 1592 was the second one built to the later diagram, D.227, and is seen from the compartment side with the revised spacing of the windows. Although pressure ventilated, torpedo vents were also fitted above each compartment: hard to see in this picture against the whited-out background, they show clearly in the next picture below. Photo: Author's collection.
Click on the image for an enlargement

I've included this view of D.227 No E1677E because it's the corridor side and details on the roof show much better. The pressure ventilation ducting can be seen on the underframe - note the fresh asbestos lagging for in this diagram the PV was heated. BR lettering and numbering has been applied over the varnished teak. This particular car was chosen by Thompson in 1949 to trial 6-wheel bogies instead of the usual Gresley heavy bogie; it was a one-off and probably reverted to normal in due course. I think that Thompson had a thing about six-wheels! Photo: Author's collection.
Click on the image for an enlargement
Some details

This detail is from the SLF-twin D.18A which was converted to carry a shower. It's useful for showing the gas tank that was added. Photo: Author's collection.

An internal view the shower. My apologies for the tones - the photographer had a wretched time lighting this scene and on the original reflections of the floodlights are prominent. It is good, though, to see this fitting that was never copied by the rest of the Big Four companies. Phtoto: Author's collection.

And the interior of a 1st class compartment that I worked off for the model. Photo: Author's collection.
The model

The interior was a wonderful challenge! From the left you can see the attendant's compartment and, on the table, a bottle of milk, mug of tea and a plate with a slice of cake (shows better than sandwiches)! The shower compartment cannot be seen from outside so I left it empty. In the sleeping cabins the main fittings employed Plastikard. In some cases the shelf is up, in others, it has been dropped down. For the bed, the pillows were made by scraping lengths of strip, then cutting off and completing. Making a batch helps. For the bed spreads I cut strips of cloth and painted over when glued in place. The doors carry the compartment numbers for which I used using Methfix transfers from a goods sheet that included black lettering for refrigerator wagons.
Some of the windows I screened off with teak panels and left the compartments empty, of course. Otherwise, you can see all the internal details although, as there is only one window to look through, you need good lighting or a torch. How much of this you choose to add is always a personal choice and all I can say is that it was a great challenge! :-)
Click on the image for an enlargement

I have, alas, no pictures of the sides taking shape and the best I can say is that cutting and joining Kirk sides from two 61'6" kits was plain sailing. The longer roof was made the same way. I have to confess that when I made this model I had little beyond the undetailed Diagrams to work off and I missed the end piping going onto the roof ends. Since having found more pictures, I must say that these fittings are worth adding.
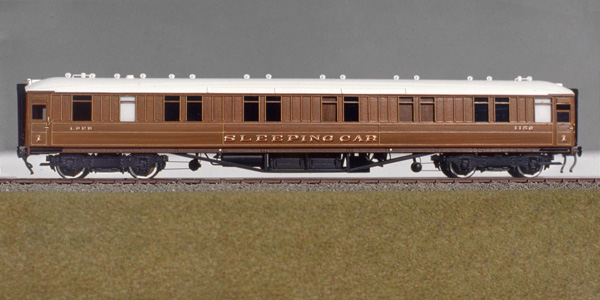
On the finished model, the compartment side stands out because of the white-screened shower compartment, with the guard's compartment to the left. Many of the windows to the sleeping compartments are open; others are closed by wooden sliding screens for which I used pieces of teak-grained Plastikard.
The underframe got more of my attention by working off related pictures. Nearly everything came from MJT although the secondary battery box positions vary between the photographs. For the trussing, I used the 61'6" castings: the truss posts have the same spacing but the trusses reaching out towards the bogies were longer so I cut them free of the integral base on the casting with a piercing saw and bent them down to suit. Note the cylindrical tank and pipe which provided gas for the shower and I made up from scratch.
Click on the image for an enlargement

The corridor side is also plain sailing. Note the compartment door numbers, a nice detail applied using the same small black Methfix transfers. Bogies were 8'6" heavy.
Click on the image for an enlargement


