S&DJR goods brake vans
Having described the ballast brake vans, the theme continues with several more S&DJR goods brake vans. Here's the types that can be modelled, four scratch-built and one via a D&S kit :
10T goods brake van 20T 6w goods brake van 20T 6w goods brake van (via D&S kit) Special goods brake for Radstock - new section ------------------------------------------------- 10T ballast brake van*
*Separate topic, see link below.
I described the Ballast Brake Van first (see link below) because I photographed the body taking shape. All the others had pretty similar bodies so I shall skip that part and proceed to other aspects.
Standard 10T and 20T goods brake vans
Readers may be amused to know that I did actually write these two up and sent it to a certain Journal in Didcot, where it sat for sixteen years (Dear Sir, is this a record?) before sending it back, without a word. That's a sharp practice which blocked me from sending it to another magazine.
Historical notes
An excellent source is An Illustrated History of Southern Wagons, Volume 3 One: LSWR and S&DJR by G. Bixley et al. OPC, 1984, containing potted histories, photographs, drawings and running numbers, and still one of the finest examples of its kind. Here are two additional pictures, in chronological order:

A well-used example of the 4w 10T goods brake van in the early grey livery with plain white lettering. Ex-works pictures of S&DJR wagons show a fairly light tone but in-service views range up to what may be described as very mucky and dark, like this one. It is still possible, however, to make out the black-painted ironwork. Despite the condition, this appears to have been an official photograph and the background has been whited out, a common practice, and not perfectly, hence some unevenness around the edges; I have tried fix the worst of it. Photo: Russ Garner collection.

This later example of a 6w 20T brake van, of which 24 were built, was photographed not only in sparkling ex-works condition but the later livery where the grey appears to have been a little paler, and the white lettering was shaded black. The picture also shows the original condition with full height ducket. Photo: Richard Dagger collection.
More sources - There used to be an S&DJR Study Group which produced detailed drawings (by John Childs) but there is now the Somerset and Dorset Railway Trust which has an archive, website and a magazine/journal, called "Pines Express". The D&S kit (of the 6w 20T van) offers a good abstract of sketches and notes.
And, there has been a fifth book, "Southern Wagons Pictorial" by Mike King, OPC, which contains quite a lot more material for the S&DJR, these brake vans included.
Into BR days - according to Gerry Bixley and fellow researchers, only a few of the 10T vans made it into LMS ownership and details are lacking. Of the 6w 20T van, built between 1898-1923, most and perhaps all became LMS property in 1930 when they began receiving LMS livery and, once in general service, they would have travelled more widely. Indeed, it's known that guards were partial to comfortable, good-riding brake vans and they could be purloined, especially for longer distance runs. Pre-Grouping vehicles in Big Four service, and even BR days, tend to get overlooked by modellers, whiich is a shame as many were good looking and add character to a train. No railway ever had all-modern, recently-built rolling stock - the old stuff continued to be used for a long time. At least one of the 6w 20T vans is known to have still been running in 1953.
The models

The first view shows the 20T brake with the body complete and footsteps attached to the solebars. The lower step is made from brass L-section and the upper one using cream-coloured Plastikard (to make it show better on photographs). The hangers were made out of brass strip. Note how the springs have also been attached to the solebar.
The wheel and axleguard units lie below, made in my usual fashion for 6w vehicles and are based on MJT etched brass W-irons with the brakes and axlebox castings attached. The three wheel units are connected by a piece of wire. When assembled the end ones will pivot on 8BA bolts, seen emerging from the floor-pan. One will have simple bearings to give a level and steady ride. The other one will be free to do as it wishes, the height set by an 8BA nut. The middle one will be completely free. It's very simple and it works very well indeed.
Click on the image for an enlargement

Looking down on the Plastikard roof with fittings as per the drawing in the book. The separate fitting lying to one side is the guard's stove and chimney made from various pieces of plastic tube. The top end had some brass rod sticking out which makes a press fit underneath the chimney on the roof. The roof and stove unit will be attached last. It can actually be seen through the guard's door dropligts, so I fitted it. It was fun to do, anyway. :)
Click on the image for an enlargement

All ready for the paint shop, the model poses for the camera with all three basic units complete - roof, body, wheel units (four if you count the buffers) - to be painted separately.
Click on the image for an enlargement

10T and and 20T brake vans together, ready to be painted.
On the small van, there was no lighting fixture on the roof and so, no end steps or rails to gain access. A tricky part was at the verandah where vertical pillars reach up to the roof and there is a curved timber. I made that out of Plastikard sheet using the roof as a guide and scoring a ring of the right radius with dividers, then cut it out. It's better and easier than trying to form a piece of Plastikard and it has no stresses that might later cause a loss of shape.
On this van, the only fitting on the roof was the chimney and the rain strips. It really was an old-fashioned and relatively primitive vehicle.
By contrast, the more modern 20T 6w van, which was partitioned into two areas, could have two lights on the go. The larger area with generous double doors was probably used to carry small items consigned by goods train in the manner of a "road van".
Click on the image for an enlargement

The two vans complete, a delightful pair. The grey shades on body and roof differ slightly and are toned down. The main transfers came from the Methfix range, the small lettering for an old sheet of pressfix-type transfers.
Click on the image for an enlargement

The 10T van in close-up. The lamp bracket catches the eye, made from brass strip with a wire passing through it and into the body to help secure it.
Click on the image for an enlargement

The 20T van takes a bow. This is the original version with large ducket. A grey area for me concerns the couplings: the drawing in the book shows 3-link but I suspect that the photograph may have screw couplings.
Click on the image for an enlargement
20T brake van via the D&S kit
Danny introduced his kit towards the end of his creative period and it is quite something, the result of many years designing kits and I rate it as one of his finest. It's actually a hybrid of materials and some parts are breath-taking. For example, where the norm has been to make outside framed vehicles as chunky (and heavy) castings, Danny designed an etched brass body with the external timbers as a daringly thin whitemetal lattice. For the ducket, he opted for the later modification with a reduced height to take a lamp on top. He also provided "top hat" lamp covers on the roof. These are pleasing variations compared with the scratch built model; otherwise they are hard to tell apart.

Click on the image for an enlargement
Special goods brake van for Radstock
This goods brake van was a one-off built for use at Radstock where there was a very low bridge on one of the colliery branch lines. It's been described as more of a shunting truck and th eonly information I could find was the photograph below, of which I show a rather small reproduction. I was sent an A4 size laser copy off a print but have mislaid it! Until I find it again we're all forced to squint at this small reproduction, and note that the copy in "An Illustrated History of SOUTHERN Wagons, Volume One: LSWR and S&DJR" Gerry Bixley et al, was the one I worked off to produce a scale drawing. And then built the model.
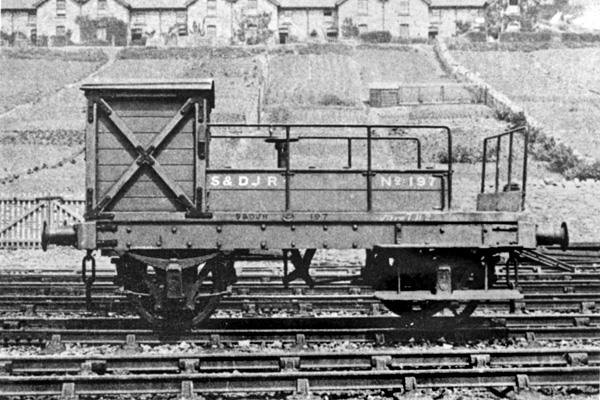
Special goods brake van No 197 stands at Radstock in relatively clean condition. There was no other information so I had to improvise the ends based on the standard goods brake vans described above. Photo: C.G. Maggs Collection.

A broadside view of the model shows the structure well with the manual handbrake on the centreline. The body and underframe were built in the same way as the standard goods brake vans using Plastikard and MJT components. The manual brake linkages were out of brass strip and wire, worth doing as they show well. The powerful buffers came from one of the loco kit-makers, Alan Gibson, beautifully sprung, too.
The livery was toned down as usual to a dusty appearance. Transfers came from the Methfix range, the smallest letters pirated from standard sheets where the right font and size could be found. Some people think these transfers are a fiddle but they are not, and the results speak for themselves.
Click on the image for an enlargement

A more relaxed view from a higher angle is less formal and gives a nice feel for this distinctive brake van. You can see the gap between the long boxes either side of the central passage, where the guard would have to duck down when passing under the low bridge. Heaven knows how he managed on a rainy, wet day to hide inside the cabin which was not much larger than a dog kennel! Like the other S&DJR goods brake vans, the model went to Russ Garner who emigrated to Australia, so I never got the chance to see them on his layout. Russ, if you see this, please send us some nice pictures! :-)
Click on the image for an enlargement
