GNR 1st Saloon
I built two models of the final bogie saloon by commissioning custom etchings of the body from Dan Pinnock (D&S). They were excellent but Dan never got round to releasing them as kits, which is a shame because they make such beautiful models and were among the most enjoyable that I have ever built. Alas, I did not take any pictures during construction, only after completion but, to be honest, it was pretty routine and I hope this shows how I went about it.
There are two basic approaches and both work well. I've described them before so this is an outline. Both rely on a body which drops over a floor pan. The body is built first and the pan made to fit inside it:
Body
This is perfectly straightforward and produces a nice shell. The recesses in the sides are made by designed-in overlaps with a spacer of scrap brass. Do the pannelling first then assemble the sides against a straight edge to make sure that they are completely straight. When ready, ledges have to be added along the bottom using inverted 2x1mm brass angle - this is how the body will rest on the floor pan. They also add rigidity to the lower half of the body and help with squareness.
For the ends I cannot remember if Dan supplied etchings but the simplest solution is MJT style with dummy brass ends and whitemetal castings outside them.
Underframe
There are two basic approaches:
- plastic: the base is thick black Plastikard (.060") and the solebars channel-section 1/8" wide, which is 3.18mm and not far off a scale 3.5mm for an actual 10 1/2" . - copper-clad sheet with brass channel 3x1mm for the solebars, the nearest available. This is the approach that I used. It's quite tricky to solder this base because the heat bends the Cu-clad, which you have to counter, but the result is supremely solid, and I like that.
The underframe fittings were entirely MJT with turnbuckle trussing and the battery boxes souped up by fitting the carrying shelves. They were plain at this point. The dynamo belt was brass strip.
Bogies
Standard or "light" 8'6" bogies were fitted and the ABS version is excellent, or the MJT one with a CCU compensation unit. There are others on the market that don't cut the mustard as well.
Interior
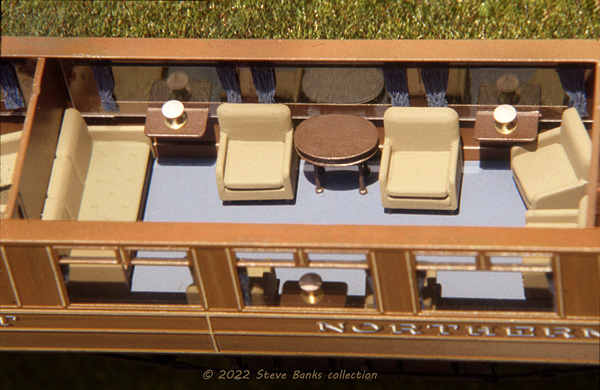
This is a lot of fun and there's a doll's house element to it. Bear in mind before starting that the GNR photographs were taken with a wide angle lens and the inevitable distortion has lost some of the right angles. It's a common misinterpretation. The sofas and settees were made out of Plastikard with dimples drilled in the surface to simulate the cushions' upholstery.. The tables were made with a Plastikard sandwich and legs from brass pins. Table lamps came from brass turnings that I had made a long time ago and I'm not sure what castings are available these days. A big point here is that the interior of this open carriage is highly visible and a pleasure to see - effort with the content is well worth it. My only regret is not having added the lavatories because when you take the roof off they can be seen.
Roof
The MJT roof has a lip along the edge and sits comfortably on the body. It can be attached, of course, but I left it loose so that you can lift it and enjoy the interior. The Al extrusion has to be cut to length and the end castings fettled, which is quite a tussle: take it easy, a bit at a time, to avoid taking off too much and you will eventually get there. Roof fittings were pretty standard, the trickiest part being rain deflectors over the doors using microstrip. Without them the carriage just doesn't look right.
Final details
Gangways - various kinds are available: mine were scratch-built with brass outers, black paper bellows and a cloth cover. Hoses - are for a static model really and whitemetal castings on brass wire pushed through the headstocks to give flexibility and easy removal for running in train.
Livery
In GNR days the lining was primrose shaded sky blue; in LNER days, the shading was red. This is almost impossible to achieve in 4mm scale and the best advice is to apply primrose that is not too warm. Transfers were Methfix.
The results
The layout is quite complex and it helps to look at the historical topic (link below) with its interior views and floor plan.

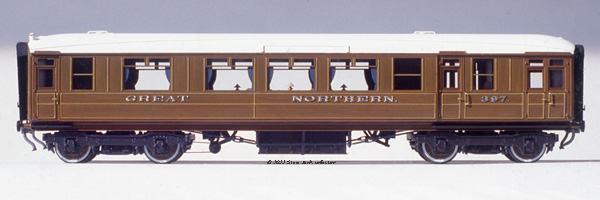
The first one that I built, No 397, seen from the lavatory side. From left to right are:
- the luggage or locker compartment with double doors - a conventional compartment, 3rd class for staff - 3rd class lavatory - main open saloon - smaller open saloon - 1st class lavatory - end vestibule
Click on the image for an enlargement

The other side had the corridors and looks quite different. As far as I know, the windows opposite the lavatories were not frosted.
Click on the image for an enlargement

With the roof lifted, the main open saloon can be seen with a glimpse of the smaller one alongside. I don't know what the interior colours were and settled for a relatively light buff shade for the upholstery to give a feel of the GNR photographs.
Click on the image for an enlargement

The second model made a year or so later was of No 807 and this shows the lavatory side. It's a more elegant picture and the support shelf under the battery boxes is slightly more detailed.
Click on the image for an enlargement

With this model I didn't fit handrails across the windows on the corridor side opposite the 3rd class compartment or the lavatories and I'm afraid to say that there is no evidence to show which of the models is correct in this regard.
Click on the image for an enlargement
Related links:


